• Home
  • About
  • Archives - Wading Through
  • Archives - The Craft Sea

Wading Through...

  • Home
  • About
  • Archives - Wading Through
  • Archives - The Craft Sea

SSINK September 2015 Blog Hop

Welcome to the Stylin' Stampin' INKspiration blog hop! This month we are welcoming fall! As you hop along, please be sure to comment and show some love on every blog! We are always excited to hear from our followers! You should have just left stop number 7 on the Stylin' Stampin' INKspiration Blog Hop - Bree @ Craft-somnia Momma. If so, you are in the right spot. If a link doesn't work or you get off track, you will find the full blog hop lineup below.

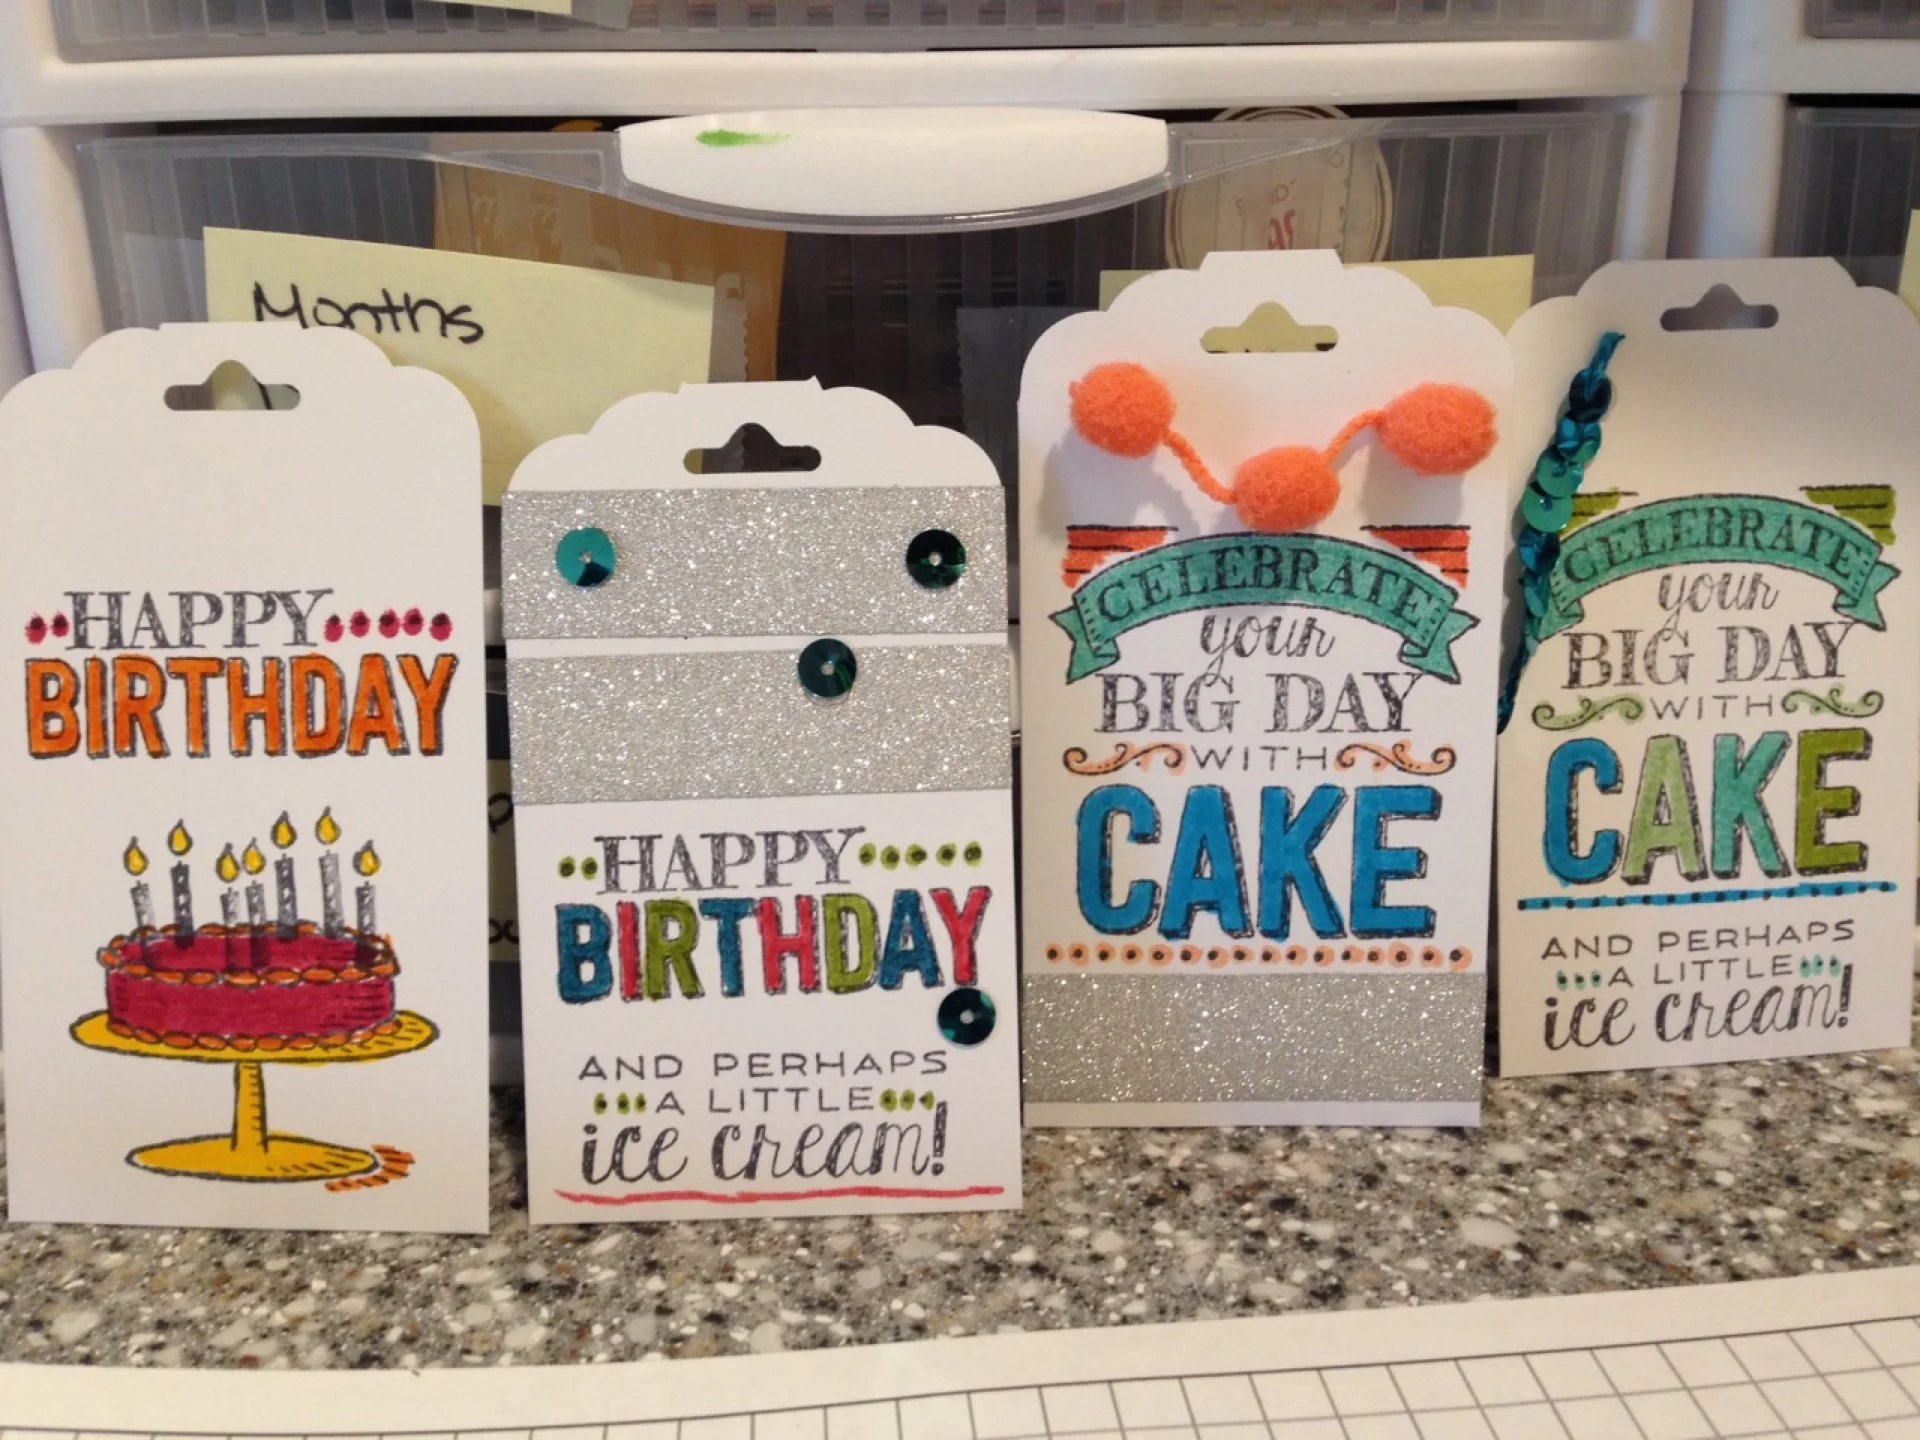
This month's theme was welcoming fall and what better way to welcome fall than with a bit of inspired card candy. Never made card candy? It's easy. Create a few embellishments to add to a card. The best card candy pieces are 3D with multiple layers and embellishments. I well simple this time by adhering some stamped images to a layer of Typeset DSP and heavier vanilla cardstock underneath. For packing purposes, I attached the card candy to a piece of window sheet with a glue dot. Stays put, but easy to remove and adhere to an actual card. 

 
  • Stamps: For All Things
  • Inks: Wild Wasabi; Mossy Meadow; Pumpkin Pie; Tip Top Taupe; Blackberry Bliss; Delightful Dijon
  • Cardstock: Typset DSP; Very Vanilla
  • Accessories:
  • Tools: Ovals Framelits; Circles Framelits
SSINK Blog Hop Next.jpg

Blog Hop Participant List:

  1. Tobe at The Craft Sea
  2. Diana at Stampin Fun with Diana
  3. Leanne at Literally My Joy
  4. Jennifer at Jenny G Paper Crafts
  5. Jenn at Happy 2 Scrap 4 Life
  6. Kim at Stamping with Kim
  7. Bree at Craft-somnia Momma
tags: Card Candy, For All Things, Typeset DSP
categories: 3D Projects, Other Crafts
Thursday 09.10.15
Posted by Tobe Buffenbarger
 

Mini Modified Notebooks

Today's project is one of my favorite non-card crafts. I love making modified notebooks! So for August stamp club, I decided to have my ladies make their own mini modified notebooks. For my own, I went with an antique look. A bit of map paper is perfect for that antique look. But the paper by itself looked a bit too plain. I took a brayer and added some blue and yellow ink. Much better! A little washi tape and a nice little sentiment finished off the card. 


  • Stamps: Happy Happenings
  • Inks: Lost Lagoon; Hello Honey
  • Cardstock: Typeset DSP; Very Vanilla
  • Accessories: Washi Tape (not SU)
  • Tools: Label Punch (retired)
tags: Happy Happenings, Modified Notebooks, Typeset DSP, Washi Tape
categories: 3D Projects, Other Crafts
Saturday 09.05.15
Posted by Tobe Buffenbarger
 

Baker's Box Thinlits

For stamp club, I always try to have three cards and one non-card project for the ladies. July's project revolves around my newly bought Homemade for You bundle. The bundle comes with the Homemade for You stamp set and Baker's Box Thinlits. Now I don't usually make 3D projects, but I was intrigued by the size and shape of the Baker's Box. It's perfect for filling with Kisses or M&Ms or even a few small cookies. I pulled out a ton of old DSP, picked a fun subtle pattern from Park Lane and started cutting. The thinlit requires two passes through the Big Shot. If you place it carefully, you can get two pieces out of a 6" x 12" piece of DSP. From there, it's just a matter of folding along the score lines and gluing the two pieces together. Easy peasy! I added a few tags (dies included in the Baker's Box Thinlits), some ribbon, and a cute clothespin. Overall a very cute little project. I'm thinking about making 13 of them for our October retreat. Maybe fill with some candy...

 
  • Stamps: Homemade for You
  • Inks: Lost Lagoon
  • Cardstock: Park Lane DSP (retired); Whisper White
  • Accessories: Lost Lagoon Ribbon; White clothespin (not SU)
  • Tools: Baker's Box Thinlits
tags: Homemade for You, Park Lane DSP
categories: 3D Projects, Other Crafts
Saturday 07.18.15
Posted by Tobe Buffenbarger
 

Mason Jar Gift Tags

Today's card is being featured on Stylin' Stampin' Inkspiration. The challenge was to create gift tags. Now I've done a ton of birthday gift tags, but what about other types of tags? I wanted to incorporate tags into the special gifts for the retreat attendees. Twice a year, I help organize a weekend retreat for members of my mom's group. I always include some extra surprises. Last year, I went with modified monogramed notebooks and monogram note cards. This year, I want to make individual mason jar desserts. A gift tag would look perfect with the mason jars.  After playing around a bit, I decided to make tags for mason jars.


I decided to use my new Homemade for You stamp set. Perfect for packaging up little goodies or in this case, yummy desserts. I stamped the polka dot background stamp in the same ink color as the cardstock. I love the tone of tone look. From there I picked a coordinating color and piece of pattern paper to make my flower embellishment. I can't wait until October to give this out! Below is the complete collection of tags:

  • Stamps: Homeamde for You
  • Inks: Staz-on Black; Pool Party; Calypso Coral; Perfect Plum; Mint Macaron, Daffodil Delight; Old Olive; Pacific Point; Watermelon Wonder
  • Cardstock: Pretty Petals DSP; Pool Party; Calypso Coral; Perfect Plum; Mint Macaron; Daffodil Delight; Old Olive; Watermelon Wonder; Very Vanilla
  • Accessories: Gold 1/8" Ribbon
  • Tools: 1" Circle Punch; Pansy Punch; Scallop Tag Punch
tags: Homemade for You, Pretty Petals
categories: 3D Projects
Tuesday 07.14.15
Posted by Tobe Buffenbarger
 

Easy Fun Gift Tags

Our little project for June stamp club will be these fun little birthday gift tags. My goal for each month's club is to make three cards and one small project. This was the perfect simple, yet customizable project. I used one of my favorite yet retired stamp sets, Big Day. I love the ability to color the stamps. In the end, I did a fun combo of colors and accessories. My favorite is the tag with the Calypso Coral pom pom trim.

  • Stamps: Big Day
  • Inks: Basic Gray; lots of random markers
  • Cardstock: Whisper White
  • Accessories: Bermuda Bay Sequin Trim; Calypso Coral Pom Pom Trim; random scraps of ribbon; silver glitter tape
  • Tools: Scallop Tag Topper
tags: Big Day
categories: 3D Projects
Saturday 06.06.15
Posted by Tobe Buffenbarger
 

Sarah's Bridal Shower

Last Saturday, I hosted my friend's bridal shower. It was a production. I made decorations, invitations, food, and games. I started a few weeks ago trying to decide on the color scheme and decor. I settled on light pink, dark pink, green, black, and kraft brown mainly because of these great craft pIeces I found on clearance at Michael's. I packed all these supplies into my suitcase to fly back to Indiana. But before leaving I finished the invitations. See them here.

These are a few examples of the favor boxes that I decorated for everyone to take home. I took these simple white berry boxes and draped them in either washi tape or striped ribbon. Then I added a variety of flowers, bows, jewels, flags, and doilies. Each one of the 40 baskets ended up looking a bit different. I filled the baskets with colored Easter grass, jelly beans, and hershey kisses (bride-to-be's favorite candy).

The shower was held in my mom's flower shop warehouse. This offered a wide selection of tables and random centerpiece decorations that we could borrow. I bought black table cloths to protect the tables and give them a uniform look. I scattered the decorate berry baskets around each table along with extra kisses and sparkly diamonds. Very cute overall!

You can see the fun games that we played laying at each table. We ended up with bridal bingo, who knows the bride best, couple match, and what's in your purse. Everyone seemed to have a fun time playing the games. And the winners each got a little favor basket (candy, lotion, stationary, etc).

As an added activity, I had collection of Project Life cards laid out. Everyone was to write down a date night suggestion or marriage advice to the couple. I'm planning on adding these cards into the wedding scrapbook I am making.

As for the food, I went with simple with minimal cooking. Not having much time or extra helpers, I didn't want to spend a lot of time on the food. We ended up with fruit, veggies, chips with guacamole and salsa, mini quiches (only thing that was cooked), crackers and cheese, turkey rollups, lemonade, water, cookies, and cupcakes. I made a signature cocktail, raspberry bellinis, for everyone to enjoy. They were a big hit! And the cupcakes were to die for. I especially loved the chocolate ones, but the vanilla and red velvet ones were good also.

Here are a few good crowd shots.

At the end of the shower, the bride-to-be opened all her lovely presents.


Instead of making a ribbon bouquet, I made the bride-to-be a ribbon veil. She is definitely wearing this for rehearsal!

tags: Bridal Shower
categories: 3D Projects, Other Crafts
Saturday 03.28.15
Posted by Tobe Buffenbarger
 

Desktop Thursday #4

Finishing up a banner for a baby shower this week. Simple, but cute! We don't know the names of the babies, so I went with a generic "Welcome Baby" in fairly gender neutral colors.

tags: Desktop
categories: 3D Projects, Craft Supplies
Thursday 03.19.15
Posted by Tobe Buffenbarger
 

Personalized Tags

For the retreat this weekend, I made these cute name tags for our surprise gift bags. I raided my stash. One of my crafting goals is to make a dent in the scrap pile. Every one of these tags came out of that scrap pile. I decided to make each tag different to give some nice variety. The alphas came from my giant alpha stash. The embellishments also came from my stash. I didn't buy anything new to make these. Yeah me! 

 
categories: 3D Projects, Other Crafts
Tuesday 02.17.15
Posted by Tobe Buffenbarger
 

Modified Notebooks

I recently hosted a modified notebooks class.  I had seen so many cute ideas on Pinterest that I had to try some for myself.  In class we transformed two composition books and two of SU's small Kraft Journals.

Notebook #1

For this notebook I wanted to play around with patterns.  I grabbed one of my huge coordinating 12x12 stacks and pulled patterns I enjoy.  From there, I layered on the paper with my floral framelits until I had filled most of the cover.  The back has the light blue paper with a strip of yellow and washi tape.  For both of the comp notebooks, I added a few strips of washi tape at the binging to give them more visual interest.

 
  • Stamps: Hello There
  • Inks: Chocolate Chip
  • Cardstock: Random scraps
  • Accessories: Washi tape
  • Tools: Floral Frames Framlits

Notebook #2

For the second comp book I wanted to be bolder and simpler.  I went with a pack of SU's Confetti DSP as my base paper.  Added in some fun washi tape and a glitter initial to complete the notebook.  Simple but very cute.

 
  • Stamps:
  • Inks:
  • Cardstock: Confetti DSP
  • Accessories: Glitter letters; Washi Tape
  • Tools: Starburst Framelits

Notebook #3

For this small kraft journal, I knew I wanted to use the gold leaves I just acquired from Michaels.  I built the rest of the notebook from those leaves.  I love how the stars are sprinkled in the background.  They also appear on the backside.

 
  • Stamps:
  • Inks: Blackberry Bliss
  • Cardstock:
  • Accessories: Color Me Autumn washi tape; Alphas; Gold leaves; Jewel
  • Tools: Stars Decorative Mask

Notebook #4

The last notebook is a modification of a notebook design from SU's convention in July.  I added the fun blue washi tape all the way around the notebook.

 
  • Stamps: Kinda Eclectic
  • Inks: Baked Brown Sugar; Mossy Meadow; Midnight Muse (retired)
  • Cardstock: Whisper White; Random scraps
  • Accessories: Brights candy dots; Washi tape
  • Tools: Ovals Framelits; Sponge daubers
tags: Confetti DSP, Hello There, Kinda Eclectic, Modified Notebooks, Washi Tape
categories: 3D Projects, Other Crafts
Tuesday 11.11.14
Posted by Tobe Buffenbarger
 

October Card Swap

For October's swap, we were to make a tag and an embellishment.  I decided that I just couldn't do two Christmas items, so I made a birthday tag and a Christmas embellishment.

Card #1

I wanted to have a good layered tag with some of that great Moonlight DSP.

 
  • Stamps: Perfect Penants
  • Inks: Blackberry Bliss
  • Cardstock: Moonlight DSP
  • Accessories: Gold Metallic Buttons; Gray Twine; Purple Ribbon (not SU)
  • Tools: Scallop Tag Topper Punch

Card #2

This simple star is not really a star at all.  Its five Christmas trees arranged in a star.

 
  • Stamps: 25 Days
  • Inks: Cherry Cobbler
  • Cardstock: Whisper White; Trim the Tree DSP
  • Accessories: Silver Glitter
  • Tools: 1 3/8" Circle Punch; Christmas Tree Punch
tags: 25 Days, Moonlight DSP, Perfect Pennants, Trim the Tree DSP
categories: 3D Projects, Christmas Cards, Other Crafts
Saturday 11.08.14
Posted by Tobe Buffenbarger
 
Newer / Older

Powered by Squarespace.